DIY Isometric Trainer for Under £60
I’ve been going down a rabbit hole of overcoming isometrics for some time now. If its good enough for Bruce Lee it’s probably got something to offer me.
For those who don’t know, overcoming isometrics is a variant of isometrics where you are pushing or pulling against an immovable force - it’s a pretty safe way to train and yet you can recruit maximal muscular effort, so it’s like performing a 1 rep max without all the risk of having heavy weights breaking you. The isometric bit just means constant length, so your muscle is contracted but neither shortening or lengthening. The other version is called yielding isometrics and would involve resisting a weight like a wall sit or holding a dumbbell in a curl.
It is pretty simple to perform an overcoming isometric - you could push against a solid brick wall or attempt to pull a 10 tonne truck with it’s handbrake on. While these would undoubtedly be effective, they don’t hold much interest for me because they aren’t measurable. How can I tell if I am really putting in maximum effort and if I am generating any more force as time progresses?
The commercial version of this idea is the Iso-Max, which retails close to £750! Its just a platform with a strap and a pulling bar - admittedly that pulling bar has a little screen that reports your maximal force generation - but seriously, £750?! That is wildly overpriced for what it is.
So I built my own.
The Build
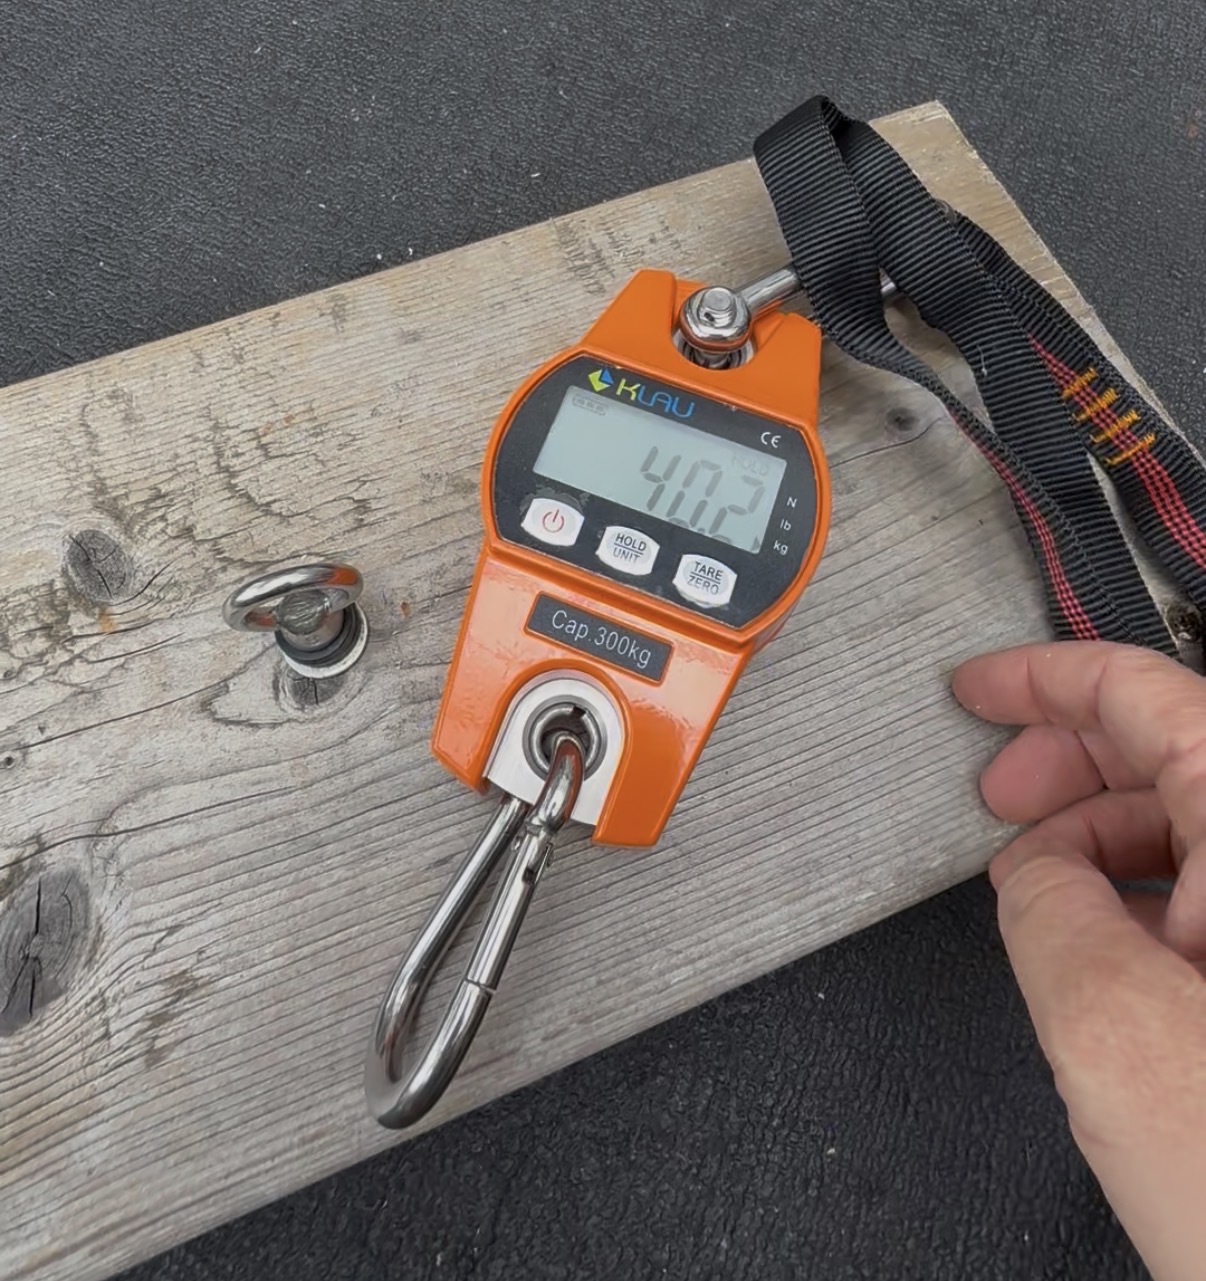 The core of the setup is a Klau OCS-L 300kg digital crane scale, which you can get on Amazon UK for around £35-45 shipped from Amazon US. This scale actually records the maximum force reached across the whole effort automatically.
Press the hold button once before you pull, drive as hard as you can, and when you let go the peak number is sitting there on the display waiting for you.
There are a load of crane scale options on Amazon but most appear to have a manual data-freeze function rather than a genuine peak hold — meaning you’d have to press a button at the exact moment of peak effort to catch the reading. With both hands on a bar driving from a fixed pin, that’s not happening.
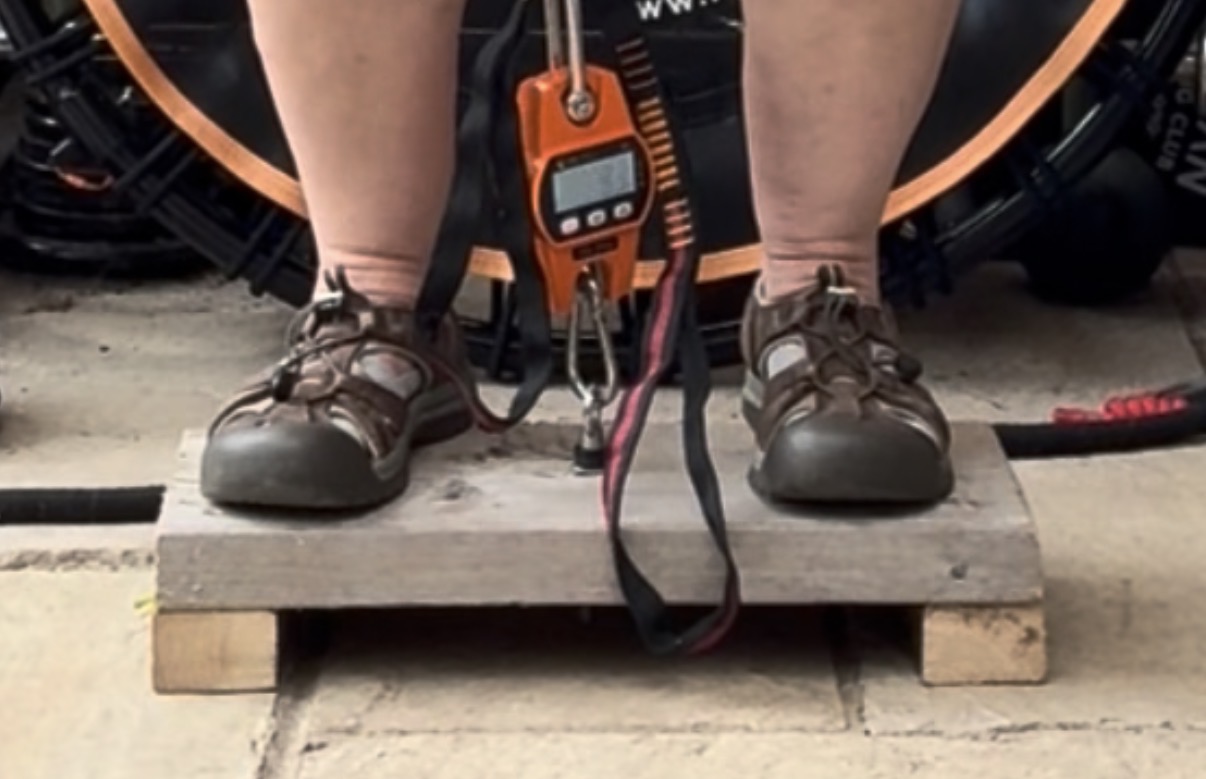
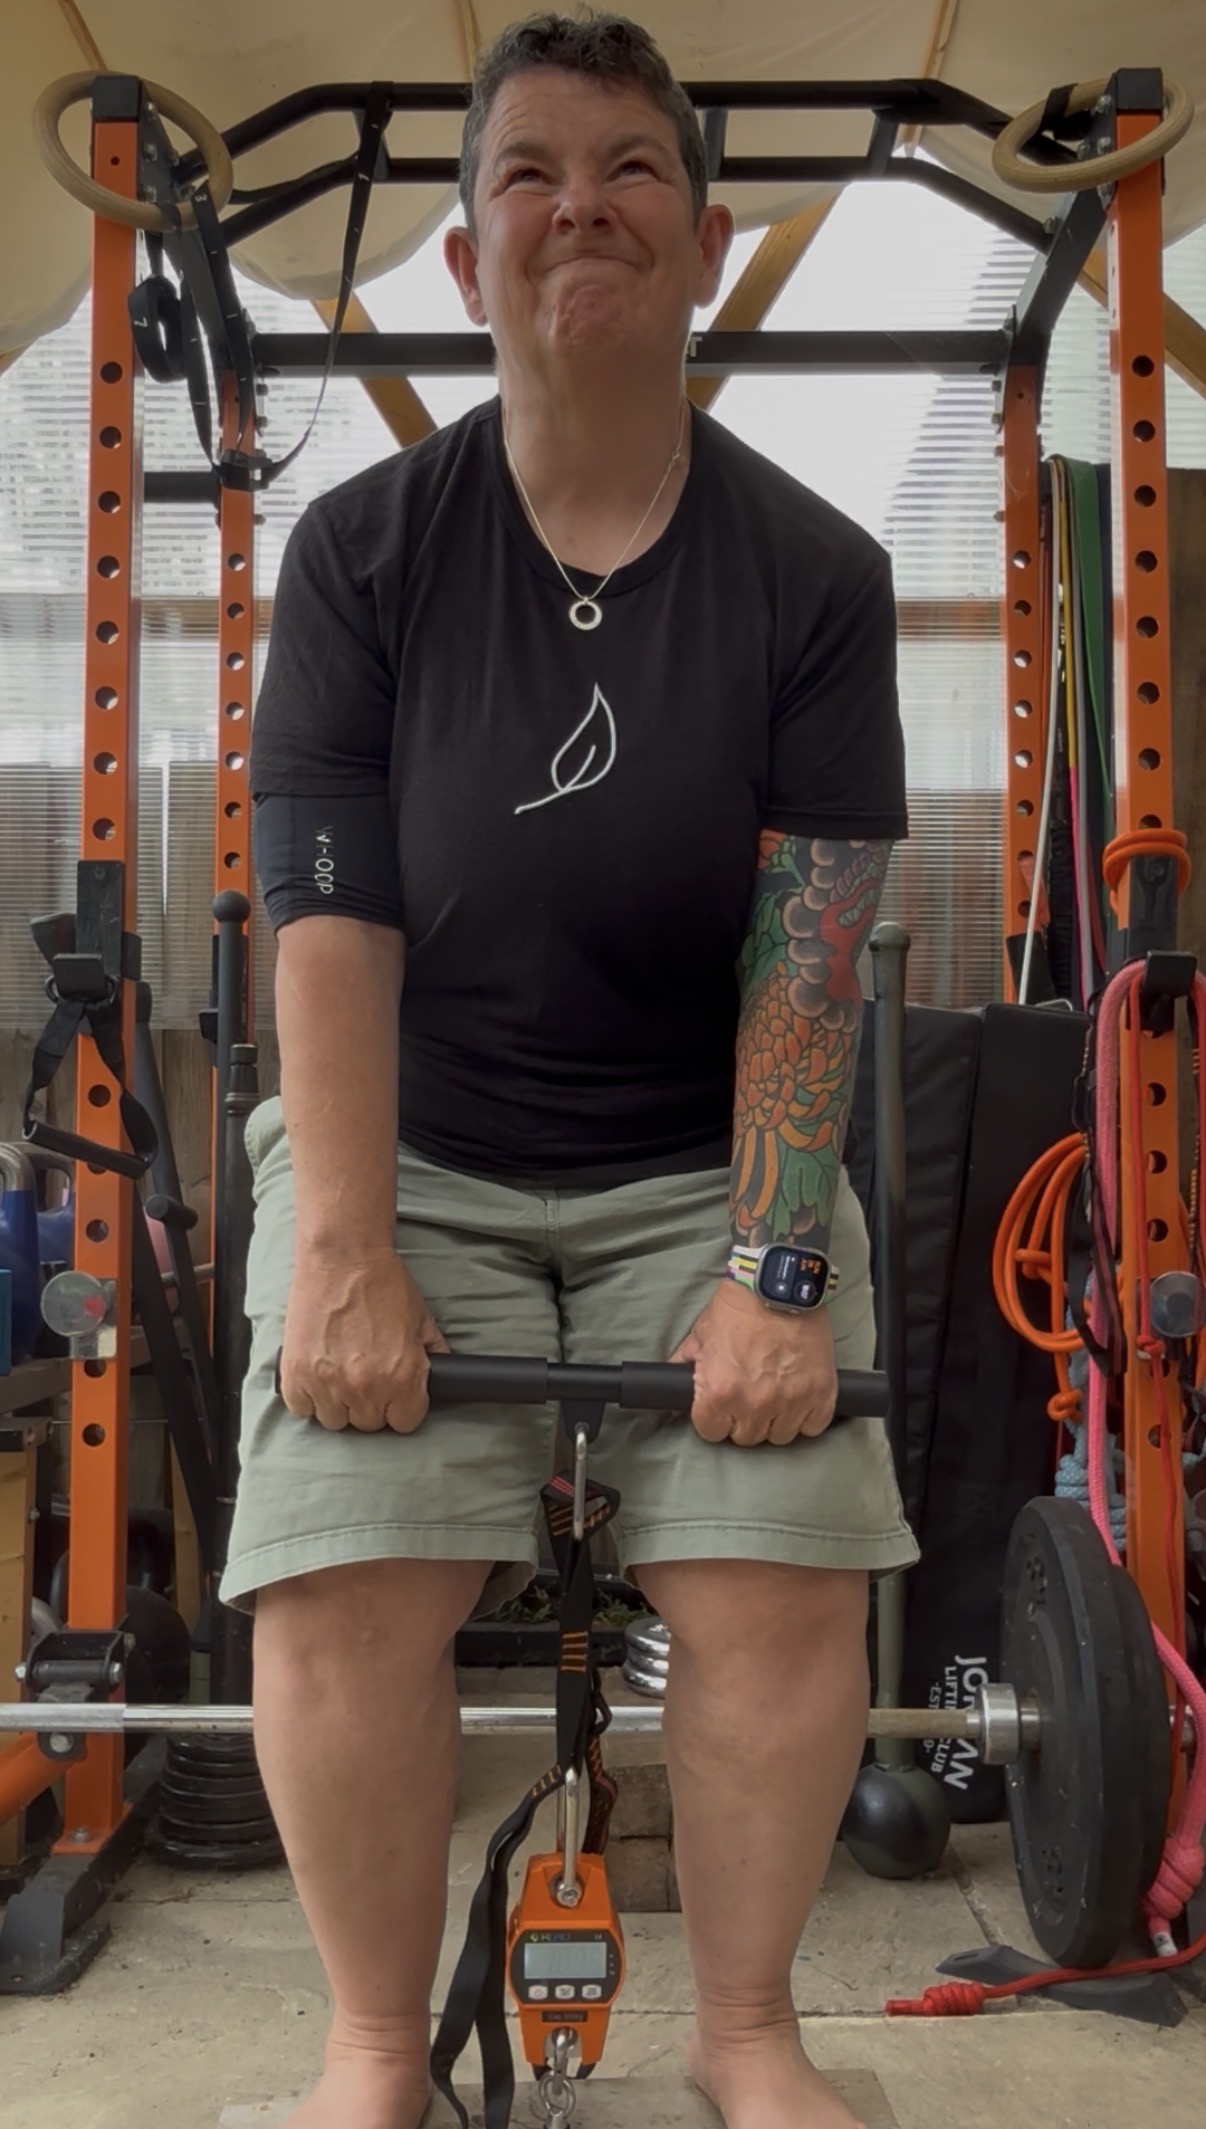
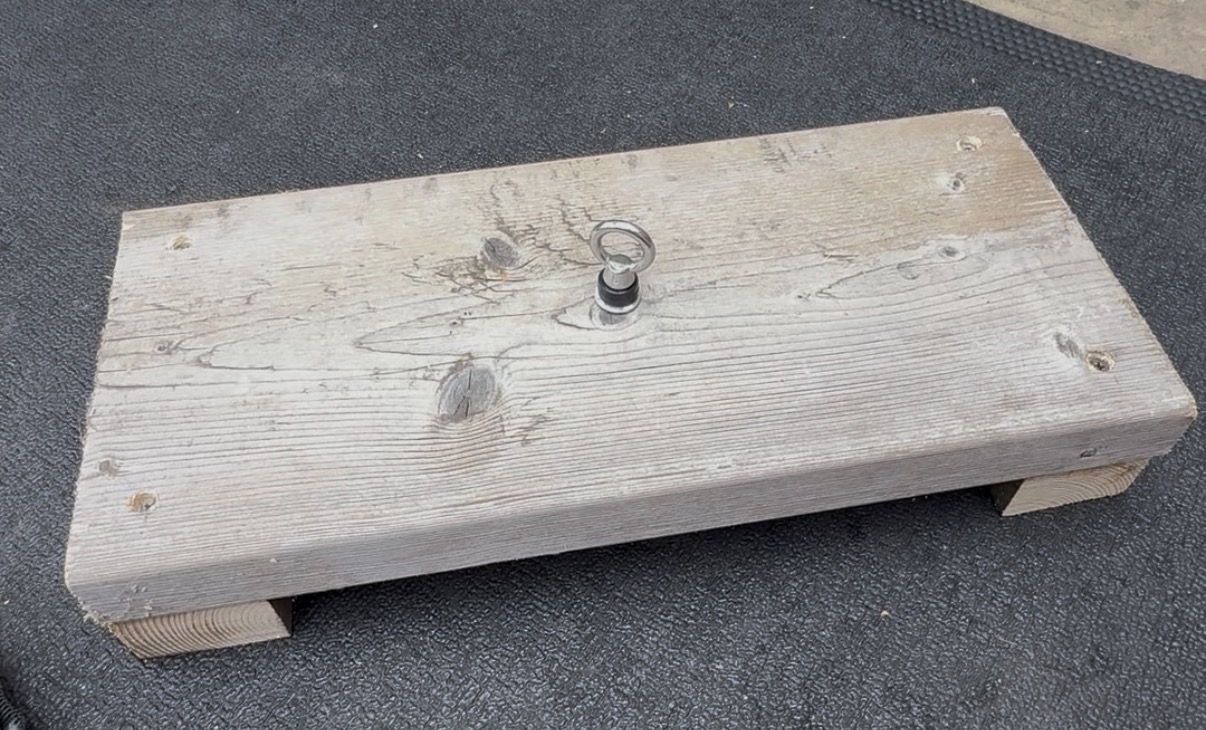 Beyond the scale, my actual build is about as low-fi as it gets: a plank of wood, roughly hip-width, with the anchor point fixed in the middle. I stand on the board to pin it down, clip the scale inline between the anchor and a strap (or chain) and then clip the bar at various points along the strap using a heavy duty carabiner clip.
Pull upwards. The board doesn’t move. The number appears. Job done.
This setup works brilliantly for anything you pull upward — deadlift variations, curls, overhead press, calf raises. It’s not going to work for horizontal or downward pulls - for that you would alternate anchor points, but that is not impossible and with the strap, scale and bar, you have everything else you need. Bruce Lee also performs squat variations with a similar device and I think that would also be an option for this but I would probably need to add 2 further anchored rings on either side, having the strap coming directly up the middle of the body could be a bit awkward for a squat.
Why Overcoming Isometrics?
An overcoming isometric is a maximal effort against something that genuinely doesn’t move. You are trying to move it with everything you’ve got, and it doesn’t care. This is different from a yielding isometric (holding a weight against gravity, like a wall sit), and the difference matters because the training effect is different.
A few things happen during an overcoming isometric that are hard to replicate any other way:
You hit near-total motor unit recruitment. Research suggests you get roughly 10% more muscle activation than equivalent concentric or eccentric work. Because there’s no movement — no velocity feedback — the nervous system has no option but to recruit maximally. It takes 3–5 seconds of ramping effort to get there, which is why you don’t just yank and let go.
It’s neurally demanding but doesn’t trash you mechanically. Heavy eccentrics will leave you wrecked for days. Overcoming isometrics are taxing on the central nervous system but produce minimal muscle damage. Useful if you’re already doing a lot of other training.
You can target weak points precisely. Strength gains from isometric training are greatest at the trained joint angle, with meaningful carry-over of approximately 15–20 degrees either side of that position (Verkhoshansky & Siff; Lanza et al., 2019, European Journal of Applied Physiology). This sounds like a limitation but it’s actually a precision tool — fix the anchor at your deadlift sticking point and you’re training exactly that position.
The caveat is that precisely because the adaptation is angle-specific, if you want carry-over across a full range of motion you need to train at more than one position. More on that below.
The Exercises — Board Setup
These are all the movements that work with the standing-on-a-board setup, where you’re pulling upward against an anchor underfoot. Fix the strap length at the position you want to train, get into position, ramp up and drive.
Mid-Thigh Pull
 This is the Isometric Mid-Thigh Pull (IMTP) — the most researched overcoming isometric that exists. Bar or strap fixed at mid-thigh height. You take a double-overhand grip, hips back, slight knee bend, neutral spine, and drive upward with the intent to actually stand up through the immovable thing.
Research (Beckham et al., JSCR, 2018) found IMTP peak force correlates strongly with deadlift 1RM and is reliable enough (ICC = 0.98 within-session) to be used as a proxy for total-body strength testing — a faster, safer alternative to working up to a true max. The mid-thigh position produces roughly 40% more peak force than mid-shin, making it a sensitive measure of upper-chain pulling strength and the mirror of the “second pull” in Olympic lifting.
This is the Isometric Mid-Thigh Pull (IMTP) — the most researched overcoming isometric that exists. Bar or strap fixed at mid-thigh height. You take a double-overhand grip, hips back, slight knee bend, neutral spine, and drive upward with the intent to actually stand up through the immovable thing.
Research (Beckham et al., JSCR, 2018) found IMTP peak force correlates strongly with deadlift 1RM and is reliable enough (ICC = 0.98 within-session) to be used as a proxy for total-body strength testing — a faster, safer alternative to working up to a true max. The mid-thigh position produces roughly 40% more peak force than mid-shin, making it a sensitive measure of upper-chain pulling strength and the mirror of the “second pull” in Olympic lifting.
Setup: Strap or bar fixed at upper-thigh height. Grip below the anchor and drive upward.
Mid-Shin Pull
Where the mid-thigh pull tracks overall pulling strength, the mid-shin pull is more closely correlated with actual deadlift performance (Bartolomei et al., JSCR) because it replicates the break from the floor — the position that usually limits people first. Expect peak force to be notably lower here; that’s not a problem, that’s useful information.
Setup: Strap fixed at mid-shin. Hip-hinge position, flat back, drive through the heels. If you’re doing both, they make a natural pair within the same session — two positions, fuller carry-over across the pulling range.
Bicep Curl — 90° Position
The curl at 90 degrees elbow flexion sits at the point of peak mechanical disadvantage for the bicep and is therefore often the limiting position in pulling tasks, loaded carries, and — very relevant for mace work — anywhere the forearm is in mid-range under load. Bruce Lee did exactly this, chaining dumbbells to the floor. I feel I’m in good company.
For fuller carry-over, add a second position at roughly 120° (forearms nearly vertical) in the same session. A minute’s worth of anchor adjustment.
Setup: Strap at waist height with elbows at 90°. Stand over the anchor, grip the bar, curl upward into the fixed resistance. Elbows stay pinned.
Overhead Press — Mid-Range
Press isometrics trained at the sticking point — elbows at roughly 90°, bar at forehead height — hit the transition between anterior deltoid and triceps dominance, which is where most people’s pressing falls apart under load. This is the position to own. Research on bilateral standing press isometrics has shown high intra-session reliability (ICC = 0.95–0.98), which means your numbers here are genuinely repeatable and worth tracking (PMC, 2024).
Setup: Bar or strap at forehead height. Stand under it, hands shoulder-width, press upward as hard as you can.
Press Lockout
This focuses on the end range of the press.
Setup: Bar around 3 inches beneath lockout, press upward as hard as you can.
The Protocol
Bruce Lee holds his isometrics for 6-12 seconds but the rise time and reps are also important. I will go for a 3-5 secs rise, 6 seconds hold, 30 secs between efforts, repeated upto 6 times.
The rise time matters. You’re not yanking and holding; you’re ramping up progressively. Research and coaching practice converge on 3–5 seconds to build up to maximal effort — it’s this ramp that allows temporal summation of motor unit recruitment, meaning you’re actually reaching close to 100% activation rather than spiking at 60% and wondering why the numbers aren’t moving.
30–60 seconds rest gives you a genuine recovery between efforts and better quality peak numbers.
Overcoming isometrics are neurally demanding. The consensus from practitioners (Thibaudeau, Winning Strength) is to avoid hammering them week-in week-out indefinitely — use them in a 3–6 week intensification block, then deload or switch to dynamic work. Consistency across a few weeks, then rotate. Your CNS will thank you.
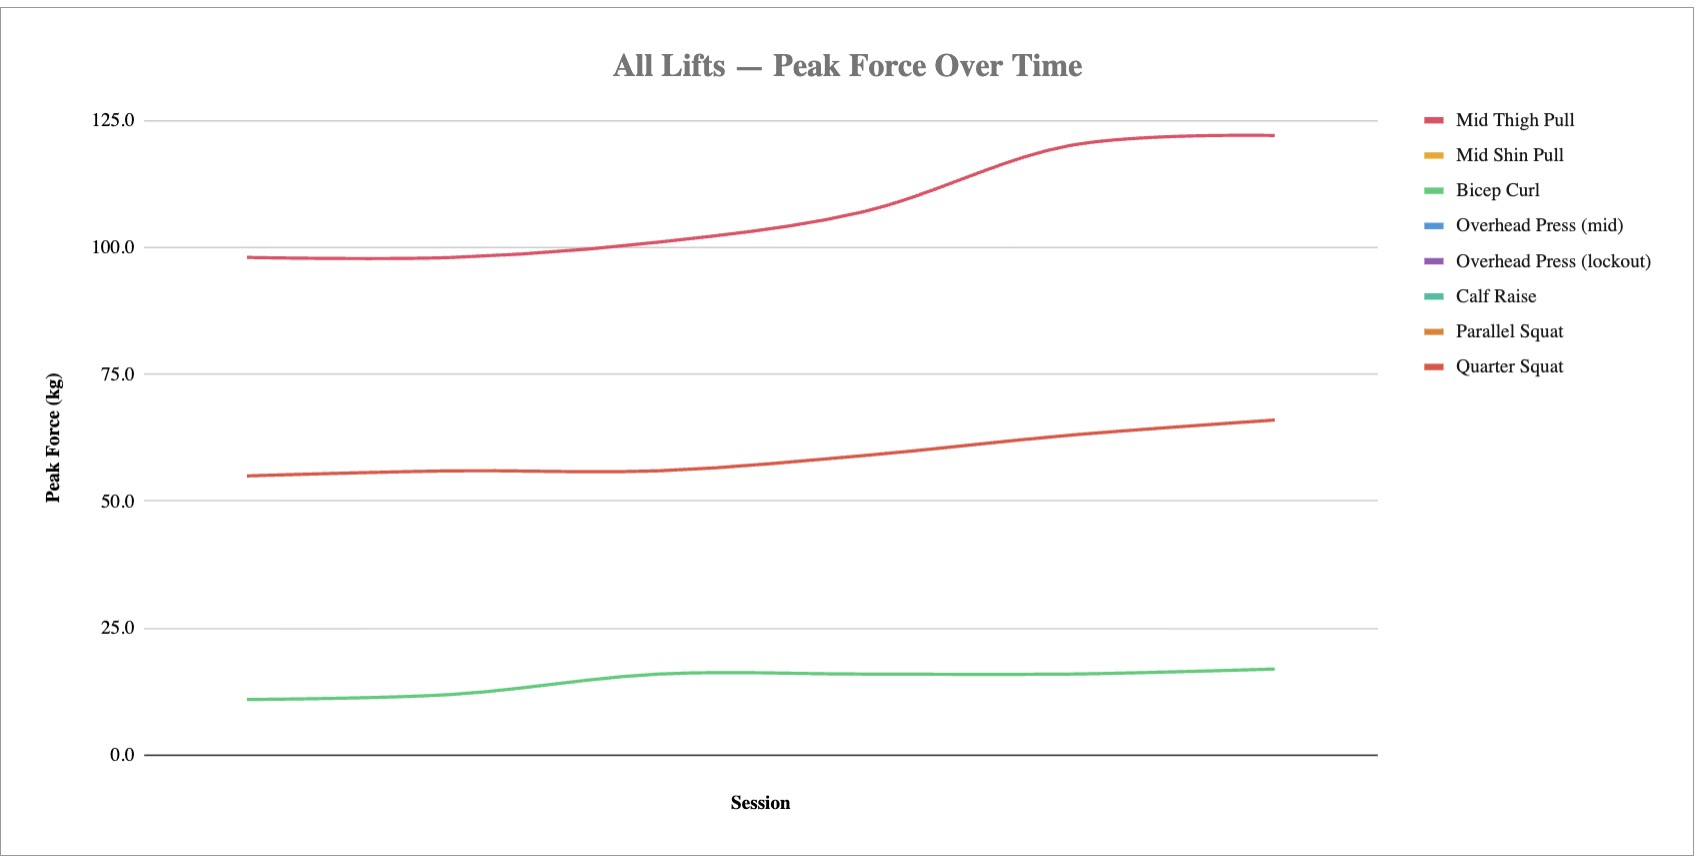
Tracking Performance
This is where the peak hold function earns its keep. These are the lifts I’m standardising and testing regularly, recording the peak force (kg) in this shared iso-max spreadsheet each time:
- Mid-thigh pull
- Mid-shin pull
- Overhead press at 90°
- Overhead press at lockout
I might also add these with a slight chnage to my setup:
- Calf raise
- Quarter squat
For the numbers to mean anything across weeks, you need to standardise everything: strap length (mark it), foot position, body angle, warm-up. Test at the start of a training week on fresh legs, not after a conditioning session.
Take 2–3 attempts per lift, 2–3 minutes between attempts, record the best. Keep it simple and consistent.
Over time you’ll also get a rough picture of Rate of Force Development — how quickly you ramp to your peak.
What You Need
- Klau OCS-L 300kg crane scale £40 — Amazon UK. This is the specific model with automatic peak hold. Don’t substitute — most cheaper scales only have manual data-freeze.
- A plank of wood, roughly hip-width — this is your anchor base
- Heavy-duty anchor point fixed into the centre of the board £6 Amazon UK
- Heavy-duty straps or chains (I had something already in my bag of tricks) - Amazon UK
- A bar or handle to grip £10 - Amazon UK
That’s it. £60-80, and you’ve got a functional equivalent of the machines sport scientists use for force testing. Just without the branding.
Expanded Options — If You Have an Overhead Anchor
The board setup gets you upward pulls and presses. The one direction it can’t cover is downward — anything where you’re pulling from above your head. For that you need a fixed anchor point overhead: a power rack, a pull-up bar with somewhere to clip the scale, or a ceiling-mounted ring.
Isometric Lat Pulldown
The lat pulldown isometric is the obvious addition here — but probably only counts as an overcoming isometric if you stand no chance of ever being able to lift yourself off the ground - which is me for now.
Squat / Leg Press Position
Bar or strap fixed at shoulder height while you’re in a quarter-squat — loads the quads and glutes at the sticking point in the squat. Needs a rack to set the anchor height reliably, or teh addition of anchor points on either side of your DIY board.
Setup: Anchor at shoulder height, get under it in a quarter-squat, drive upward through the bar.
References
- Beckham, G.K. et al. (2018). Isometric mid-thigh pull reliability and relationship to deadlift one repetition maximum. JSCR, 32(2), 528–533.
- Bartolomei, S. et al. Relationship between isometric mid-shin/mid-thigh pull and deadlift 1RM. JSCR.
- Lanza, M.B. et al. (2019). Is the joint-angle specificity of isometric resistance training real? European Journal of Applied Physiology. doi:10.1007/s00421-019-04229-z
- Verkhoshansky, Y. & Siff, M. (2009). Supertraining (6th ed.).
- ScienceForSport (2025). Isometric Mid-Thigh Pull (IMTP). scienceforsport.com
- Thibaudeau, C. Isometrics: The Most Underrated Training Tool. Thibarmy.com
- Morris, G. (2023). Overcoming Isometrics for Impactful Strength Gains. Just-Fly-Sports.com
- Winning Strength (2022). Isometric Protocols for Strength Development. winningstrength.com